Day 2 – Preparing for Research
Join Dr. Greg Vogt as he demonstrates how to build habitats and care for larvae and butterflies.
Reading Mini-Lesson
OVERVIEW

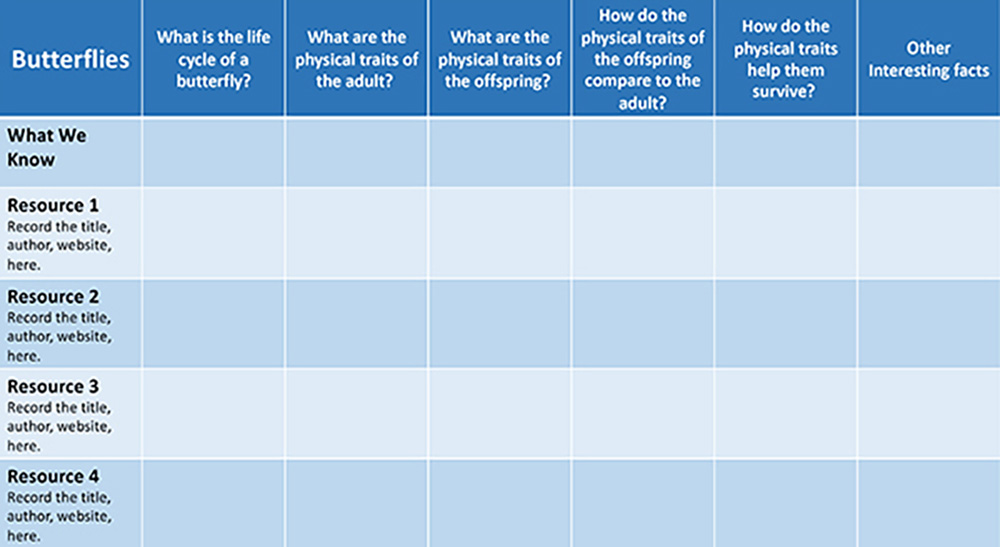
Scientists always identify a question to research and record their data in an organized matter. While a true inquiry project would allow students to develop their own research questions, for this guided inquiry, we will provide questions that can be answered for each organism to be researched. Students will record their findings in an inquiry chart. The teacher will model mini lessons each day using butterflies and will complete a class inquiry chart during the modeling.
Each group will need an inquiry chart to be created (by the teacher) on a large piece of chart or butcher paper. Be sure the size is manageable for storage when groups are not working together and will be easy for students to record on (big enough for recording space, but not so large that it cannot be laid out in the classroom for the group to work). A model for an inquiry chart is provided in the Day 2 folder for you.
TIME: 15 minutes
PROCEDURE
- Say something like, “Today, we will record information about our organism on an Inquiry Chart.”
- Say something like, “Scientists record data in an organized Each day you will work with your research in inquiry circles to complete your Inquiry Chart.”
- While you model the strategy, say something like, “First, let’s look at the research questions along the top row of the Inquiry Chart. We need to be sure we know what the question is asking.”Refer to the unit vocabulary list if needed.
- Say something like, “Now let’s look at the first column of the chart. I see that the first section asks me to record what I already know about my topic (butterflies). I will write the informationI already know in the correct section.”

- Say something like, “I see thatI will need to record my resources as I gather information. That means I will write the title and author of books I use and the address of the websites.”Remind students of this when they start researching on Day 3.
Science Lesson
OVERVIEW
This activity provides the materials and instructions for constructing growth habitat chambers for the butterfly larvae.
TIME: 30 minutes
GUIDING QUESTIONS
How do scientists study organisms? What resources need to be provided for live animals to be safe and well cared for while they are being studied?
BACKGROUND INFORMATION
When we think of scientists, our minds are often drawn to clean white laboratories filled with all kinds of glassware and machines. We usually don’t think of the other places in which scientists work. The other laboratory is nature itself. Scientists observe nature’s many phenomena and collect data and form questions for further research. Outdoor observation and data collecting go hand-in-hand with research in the classic laboratory. Our study of painted lady butterflies demonstrates just how this partnership works.
When painted lady butterflies lay their eggs, they do so on the underside of leaves of plants that are good for larvae to eat after hatching. By careful observation, scientists can find where the eggs are laid and wait for a couple of days for hatching. However, after a few days, when they come back to see the larvae, they are gone. Were they eaten by predators? Did they just move to someplace else where the food is better? The scientist can’t tell. Eventually, the scientist will find larvae again but where did they come from? Different parents? How old are they? The scientist can’t tell.
Here is where it’s important to have an indoor laboratory or enclosed space. To study the life cycle of the butterfly, the scientist collects some eggs and places them inside some sort of chamber that simulates the natural environment and provides food and moisture. In this way, the scientist can study the complete life cycle of the butterfly and compare those observations with those made in the natural world.
In this preparation activity, up to six larvae growth chambers will be needed for student teams when the butterfly larvae are delivered by the suppliers (see “Animal Care of Larvae and Butterflies” for ordering information and complete instructions). The larvae will come in small cylindrical containers along with larva food, and they may remain there if you choose. However, the benefits of larvae growth habitats are that they permit the larvae to move about a larger area than the shipped containers, and they provide and facilitate easier observation and data collection by student teams.
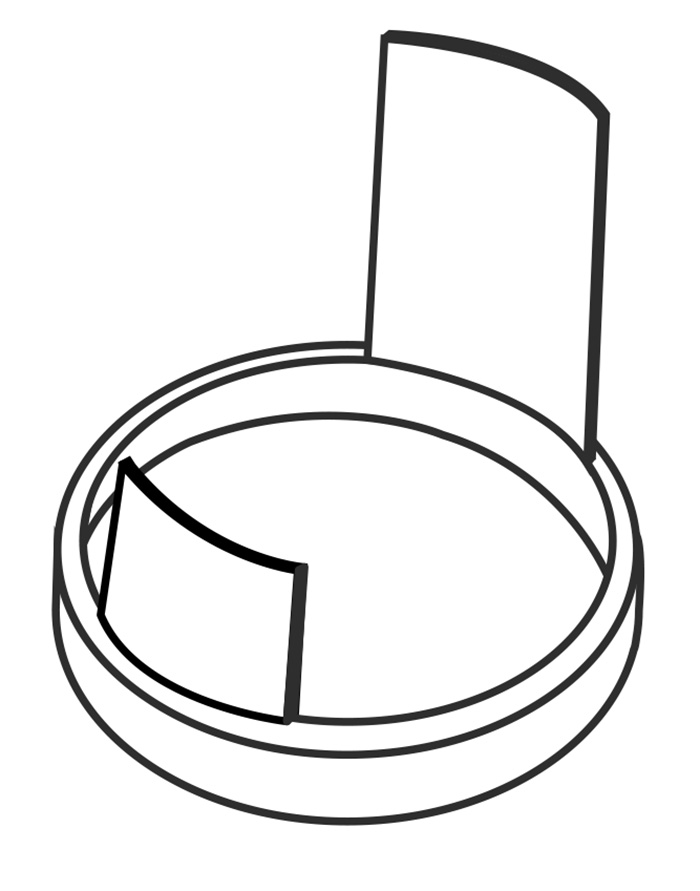
The larvae growth habitat described here consists of a clear plastic, clamshell style, take-home salad box, two clean and empty plastic coffee creamer cups, a sponge square, and a plastic micropipette.
Prepare the habitat stand before making the habitat. Clean coffee creamer cups have to be glued to the inside of the habitat. Placing the closed habitat in the stand facilitates the gluing process. Students can perform most steps in building the growth habitats. However, one step involves melting a small hole in the side “wall” of the habitat. For safety, this step should be done by the teacher.
SAFETY
Download and read “Animal Care of Larvae and Butterflies” (Animal Care.pdf) for specific information about ordering larva, etc., prior to conducting this activity. Remind student teams daily to be gentle with the growth habitats during handling to prevent disturbing the larvae.
Please follow all district and school science laboratory safety procedures. It is good laboratory practice to have students wash hands before and after any laboratory activity. Clean work areas with disinfectant.
MATERIALS
The materials below are for making one habitat stand and one habitat. It is recommended to make at least one habitat stand/habitat per student group. Please read “Setup” for specific instructions.
Per Group of Students: Habitat Stand
- 12-ounce Styrofoam™ coffee cup
- Download and print the “Make a Habitat Stand” page (02-Habitat Stand.pdf). Check the application print settings to ensure the file will print at the actual size of 100% on 8.5-in. x 11-in. standard copy machine paper Do not fit, shrink or scale the page. The illustration is accurately scaled to use with a 12-ounce Styrofoam™ cup.
- Print one pattern page for each student team on standard copy machine paper, ensuring the application print option for scaling is set to print at the actual size of 100%. Make one extra copy for you to use as a model for demonstrating to the students how to prepare the cup.
- Scissors
- Tape
Teacher: Habitat (see “Setup”)
- Butane lighter
- Ice pick, or pliers with a small iron nail or a knitting needle
Per Team of Students: Habitat
- 2 plastic coffee creamer portion cups or other small portion cups (empty and washed)
- Clear plastic take-home salad box (clamshell style, cleaned)
- Plastic micropipette
- Sponge square, about 4 cm x 4 cm in size
- White school glue
SETUP
Before class time, you will need to prepare the hole in each plastic habitat for the pipette containing water to be inserted. (See diagram below for correct placement of the hole.) Using a butane lighter, heat the tip of the ice pick. If using the nail or knitting needle, use the pliers to grasp and hold the end opposite the tip of the needle or nail After a few moments, push the ice pick tip through the plastic where indicated in the diagram. The hole should be just large enough for the micropipette to fit through to add water.
PROCEDURE
DAILY OBSERVATIONS
Give students time to observe their organisms (whether they are in the larva, pupa, or adult stage), take measurements of the larvae (if applicable), and record their observations in their science notebooks. Facilitate group discussions by asking questions like, “What did you notice?” “What has changed since the last time you observed your organisms?”
PROCEDURE
Engage
- Ask the students where they think butterflies come from. Accept all responses and discuss their ideas.
- Remind them that they are now going to become scientists working in teams. Tell them that their special investigation will focus on the life cycle of butterflies. In other words, they will observe to see how the butterflies grow and change over time. Discuss why it might be difficult for scientists to study butterflies over time in nature (outside).
- Ask students to share their ideas about how it might be easier to study butterflies. If no one else brings it up, talk about setting up an indoor habitat where the class could study the life cycle of butterflies.
- Tell the students that the class will soon be receiving butterfly larvae (very young forms of butterflies) to observe and study for their investigation, and that they will help build the habitats for them. Ask them to think about what the larvae, which are animals, might need in the habitat.
- Remind them that all living things have basic needs. Ask the class to think about we (humans) need to stay alive (source of energy -food? air? water? a place to live?) Do animals have the same needs? Ask for their ideas about what that might look like in the butterfly habitat (how will we make sure they have what they need?)
- Explain that there are several steps for making the habitats and members of each team will have a job. Depending on the age group, the teacher may assign or allow students to pick their first job designated on badges (rotating jobs as the unit progresses).
Explore
Make a Habitat Stand

- Tell the students that the first step will be to make a stand for the habitat to stand on.
- Show the students the “Make a Habitat Stand” page. Explain that they will cut out the part of the pattern that has square boxes in it surrounded by the bold (or highlighted) line.
- Teacher will cut out the large pattern from the copy and model how to place it around and just below the rim of the outside of the Styrofoam™ cup. Tape it in place.
- Explain that they will cut out the cup under the square boxes. Caution them NOT to cut out the cup under the white flaps.
- Model how to do the cutting. Using the pattern as a guide, trim away most of the coffee cup beneath the pattern, leaving just the thick cup rim, and two rectangular-shaped “teeth” attached to the rim.
- Turn the modified cup upside down to use as the stand (see illustration, above). Show them that it is now a completed habitat stand.
- Explain that the gap between the “teeth” will support the plastic habitat and the cup rim will provide a stable base.
Make a Habitat

- After all stands are complete, tell the class that they will now build the habitats for the larvae. Explain that each team will build one habitat (If you have a very small class, teams may need to build more than one each).
- Give each team the illustrated handout of the habitat. Show them the salad container and discuss correct orientation and placement of the cups and sponge.
- Have each team place their habitat in their stand to see what it should look like.
- Explain that the creamer cups will hold the food for the larvae. Have students put a large drop of glue on the bottom of each creamer cup and set the cups inside the clear box where indicated on the illustration (see PDF). Use the stand to hold the closed box upright while the glue dries.
- Next, ask them what they think the sponge is for. Have them consider the placement of the sponge right under the hole in the box. After discussing their ideas, tell them that they will occasionally use the micropipette to add a few drops of water to the sponge, to maintain a slightly humid environment inside the box. Discuss why that is important for the developing larvae.
- After the glue on the cups has dried enough, direct the students to place a sponge square inside the habitat box right under the hole that was heat-bored.
- The boxes and stands are complete and ready for the larva!
Explain
- Ask students to compare the chambers to the natural world where painted lady butterflies live. Discuss and list the things the butterflies need for survival.
Elaborate
- Tell the class that when the larvae arrive they will learn how to take care of them in the habitats they have constructed. How will the habitats provide basic needs of the larvae and butterflies?
Evaluate
- If students are using journals or science notebooks, were they able to communicate what they did or learned today? If they used drawings, were they a reasonable representation?
- Did students communicate verbally what they had learned? Did students use new science vocabulary in their responses? Did students work as a team to construct the habitats?